Internet access in your room
DSI, with the support of DPAT, plans to implement the eduroam Wifi network in Paul Comparat residences, i.e. for U,V,T,X buildings, during the month of November 2019.
Internet access ?
Internet access is available to anyone with an ECL computing account through an Ethernet socket available in each room. For Adoma rooms, only one of the two sockets works. You have to configure your computer to authenticate to the network. This authentication uses the 802.1x protocol, available on most current operating systems. The following procedure is to be performed only once.
Instructions are available below, in the Configuration steps section.
The Paul Emile Victor residence is not an ECL residence but a private residence – managed by Adoma. An agreement exists between Adoma and the ECL. This agreement provides for the following procedures to access to the computer network.
For the P-E Victor residence, i.e. for buildings A, B and C, the ECL only provides network access for ECL students. For anyone who does not have an ECL computer account, you should contact Adoma directly.
Configuration steps
Windows
Windows (Seven / 8 / 10)
- In the start menu, search “services.msc” and open the file as administrator (right click, “Run as administrator“). In the new window, search for a line named “Wired AutoConfig“.
Right click, then click on properties, then choose “Automatic” as the startup mode.
Click on “Start“.
Then “Validate“.
- In the same way as in 1., search for “ncpa.cpl” and run it as an administrator.
From the list of network cards, select the one for your Ethernet interface. It is probably called “Ethernet” or “Local Area Network Connection”. Right click, properties.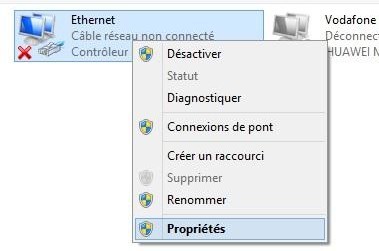
- In the list, ensure “Internet Protocol version 4” is checked and uses automatica IP addressing (IP and DNS) ; check “Obtain an IP address automatically“. Return to the properties window, and in the “Authentication” tab, check all boxes and select “Microsoft: PEAP (Protected EAP)” as the authentication process.
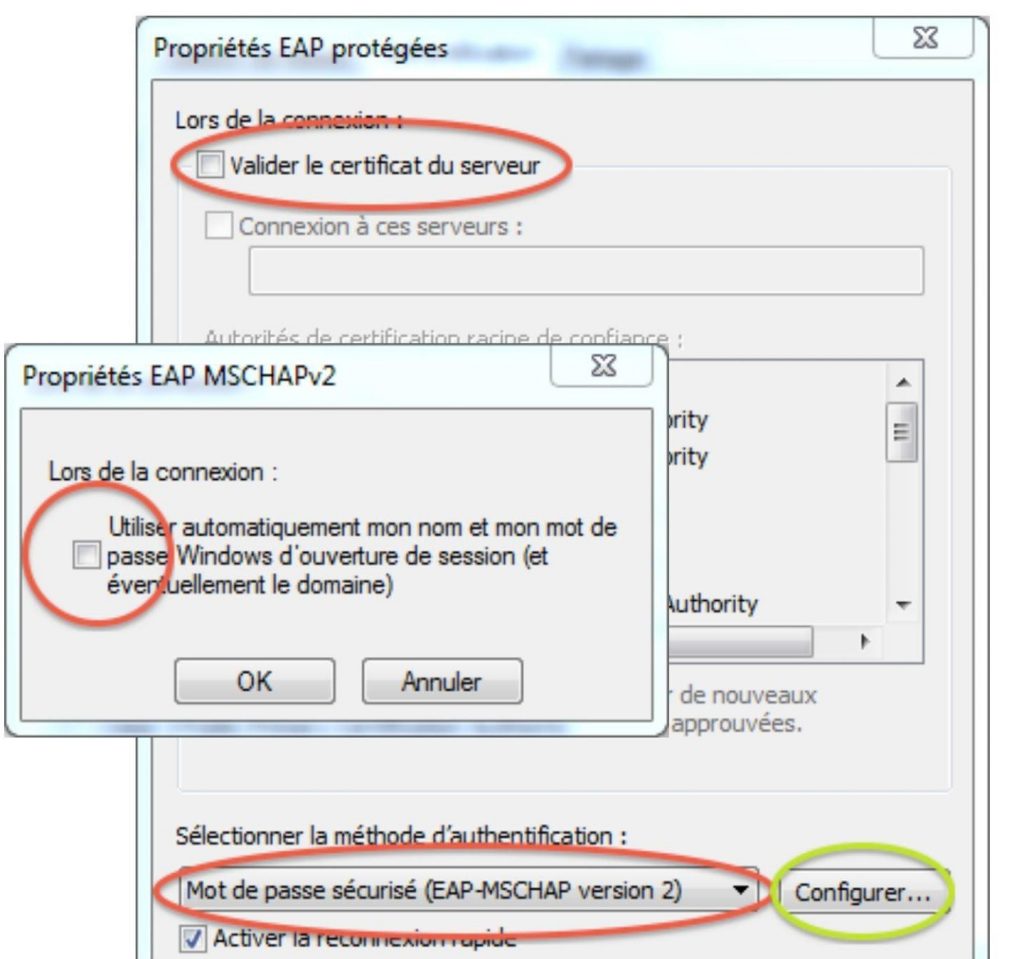
- Go to “Settings“, uncheck the box “Validate server certificate“, and select “Secure password (EAP-MSCHAP v2)“.
In “Configure“, uncheck the only box “Automatically…“.
- Confirm until you return to the properties of your network card, then go to “Additional settings“. Tick “Specify authentication mode“, select “User authentication“. In “Save credentials“, enter your ECL credentials.
- Validate everything, disconnect and reconnect your Ethernet cable if necessary : your connection is correctly configured.
- To connect, a window will open (bottom right) asking you for your ECL credentials.
MacOS X
Linux
Linux (Ubuntu / Debian / Mint)
Networkmanager
- Open your network manager (NetworkManager) at the top right and right-click the network icon
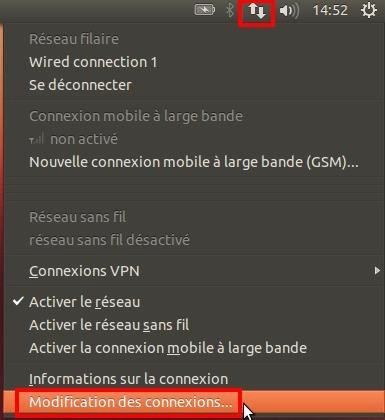
- Choose “Edit Connection” and add a new wired profile
Select “IPv4 Settings” to use DHCP.
In the “Wired” tab, choose your wired interface (eth0, eth1…).
- In the “802.1X Security” tab, check “Use 802.1X…“,
Select “Protected EAP (PEAP)” as the authentication type, and MSCHAPv2 as inner authentication.
Fill in your credentials.
Click on Save…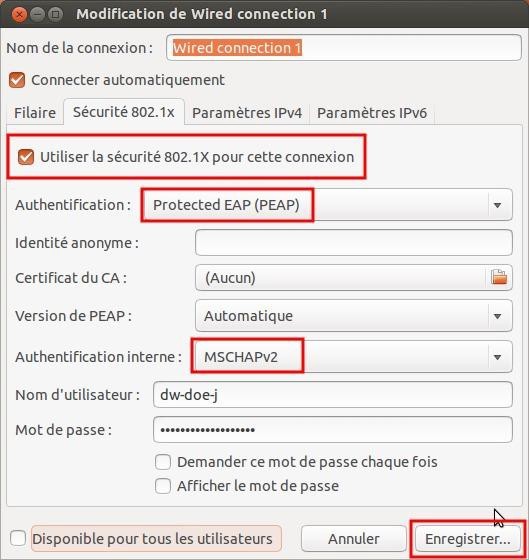
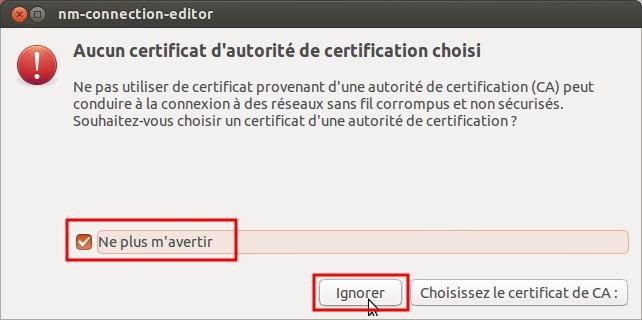
- If a warning pops up, check “Don’t warm me again” and then ignore it. Your configuration is done !
- To connect, a window will open asking you for your credentials.
With Command Line Interface (CLI)
$ sudo apt-get install dhcpd wpasupplicant
Then, you will have to create a file in the configuration directory /etc/wpa_supplicant; for example, ecl.conf containing the following lines :
ctrl_interface=/var/run/wpa_supplicant
ctrl_interface_group_group=0
eapol_version=2
ap_scan=0
network={
	key_mgmt=EAP-PEAP
	eap=PEAP
	identity="LOGIN_ECL"
	password="PASSWD_ECL"
	phase1="auth="PEAP"
	phase2="auth="MSCHAPV2"
}
Be careful to leave this file readable only by root because it contains your password in clear :
sudo chown root:root /etc/wpa_supplicant/ecl.conf; sudo chmod 600 /etc/wpa_supplicant/ecl.conf
It doesn’t work: the 5 most common problems encountered !
In order, check these steps :
- The identifiers are those of the School, provided during your administrative registration. You had to change your password: check that it is still correct by connecting to the ECL’s centralized authentication service. Each time you change your password, you will have to repeat the configuration steps.
- For Windows, remember to uncheck the “Check server certificate” box.
- Check your Ethernet network cable by trying a new cable,
- After trying too many wrong passwords or credentials, you may have been blocked. You have to wait a quarter of an hour before trying again.
- And finally, it may also be that your ethernet socket is defective: with your Ethernet cable and your computer, try to connect to another room.
If the problem persists…
Please note that the DSI exclusively supports the ECL’s network equipments. The configuration of a personal computer in your room is your responsibility.


